Teams is a communication and collaboration platform that combines chat, audio/video meetings, file storage (including collaboration on files) and integrates with the Office 365 suite of products. Teams allows you to host meetings and events with users internal and external to the University. Before getting started with Teams, all users are required to read and adhere to the Terms of Use. Please read the the Terms of Use and Microsoft Teams Best Practices before using Teams or creating a new Team.
Teams Questions and Answers

There are two options for scheduling Teams meetings:
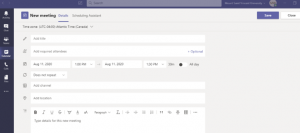
Option 1: Schedule a Meeting in Microsoft Teams
- In Teams, select Calendar from the left app pane.
- Select the New Meeting button from the top-right corner.
- Fill out the meeting details.
- Click Send to schedule your meeting and send your email invitation(s)
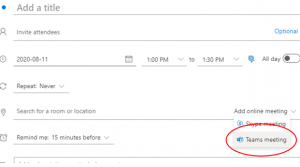
Option 2: Schedule a Teams Meeting in Outlook.
Note: the options to create a Teams meeting will vary depending on the version of Outlook that you are using.
- Create a meeting invite as per usual.
- In Outlook for the Web the Teams meeting option is located in “Add online meeting” dropdown.
- In recent versions of the Outlook app the Teams meeting option is located in the meeting toolbar.
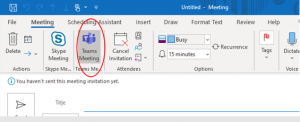
- Fill out the meeting details, as per usual
- Click Send to schedule your meeting and send your email invitation(s).
Up to 1,000 people (300 or less for breakout rooms) can join a Teams meeting.
Echo can be caused by a participant(s) having speakers that are too close to each other or by the limitations of the Echo cancellation software on your computer/device. The best way to solve this for any video conference software (like Teams) is use a headset during the meeting, preferably a headset with a microphone. If you do not have a headset with a built-in mic, the use of regular headphones along with the mic built into a webcam or laptop etc can still mitigate echo.
To test your audio prior to a meeting or a call,
- In Teams click on your profile picture to expand the menu.
- Click on Settings and then click on Devices.
- Select the Audio device you intend to use. The microphone and speaker can be the same device or selected separately if required.
- Choose Make a test In the test call, you can test your microphone, speaker, and camera
- Follow the instructions and record a short message.
- If the recording is not clear or blank return to the settings screen to choose a different Audio Device from your available options.
- If you are still having trouble, consider shutting down any other software that might be attempting to use your webcam and audio devices (Collaborate, Zoom etc), then close and restart Teams and try these steps again.
- If you are still having trouble using your audio video devices with Teams contact the IT&S Help Desk to arrange a support call with Multimedia Services.
The Meeting Chat (as well as the Meeting notes, File and Whiteboard features) remain visible to all invitees and attendee during and after the meeting. As such, it is important to think of all messages in the Chat, Meeting Notes and Whiteboard all are permanent records.
No. Although you can blind copy the invitation so that others do not know who was invited all participants can see a list of other participants.
1. After joining a Teams meeting, click the Share icon in the share tray of that meeting.
2. In the Whiteboard section, select Microsoft Whiteboard.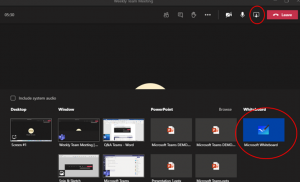
After a Teams meeting, its whiteboard will be available to all participants from the Teams meeting chat, in a tab labeled Whiteboard.
Questions about Recordings
To record a meeting, you need the consent of all participants. As well, you need to ensure they understand what the recordings will be used for, how long it will be held and how it will be disposed of. The recordings can only be used for the reason for which participants consented. Once you have the consent of participants to record the meeting, the collection, use and disposal of the record (recording) is to be in compliance with Provincial legislation.
Not all meetings are recorded. To record a meeting, you need the consent of all participants. As well, you need to ensure they understand what the recordings will be used for, how long it will be held and how it will be disposed of. The recordings can only be used for the reason for which participants consented. Once you have the consent of participants to record the meeting, the collection, use and disposal of the record (recording) is to be in compliance with Provincial legislation.
If a meeting was recorded it can be accessed in the Meeting Chat History from the Teams navigation bar, select the Chat icon, find your meeting, then go to the Chat history. Your video will be found at the end of the history. Select the More icon > Open in Microsoft SharePoint/OneDrive.
Breakout rooms are available in Microsoft Teams. You can find instructions on how to use Breakout Rooms in Teams.
Questions about Collaboration in Teams and Channels
A Team is a collection of people, content, and tools that work together. Teams are built on Microsoft 365 Groups, and changes to Microsoft 365 group membership sync to the team.
Channels are the collaboration spaces within a team in which the actual work is done. Channels inherit the full membership list from The Team. Channels are often named by project or topic.
1. Select Teams in your left rail (Navigation Bar) to view your Teams.
2. Select Join or create team.
3. Select Create a Team.
4. If you are given the option of a team type it is recommended that you Select Staff for general collaboration.
5. Enter a name and optional description for your team, then select Next.
- Find the team that you created, click the ellipsis menu ( … ) and Add member.
- Start typing a name, distribution list, security group, or Microsoft 365 group to add to your team. You can also add people outside your organization as guests by typing their email addresses.
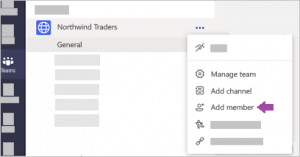
- When you are done adding members, select Add. You can make someone a team owner by selecting the down arrow next to the word
Find the team to which you would like to add the Channel, click the ellipsis menu ( … ) and Add channel. (Note: You can also do this from the Manage team and add a channel in the Channels tab.)
Give the channel a descriptive name to make it easier for users to understand the purpose of the channel.

There are no voting buttons in Teams, but we can create polls.
To add a Departmental SharePoint Site to Teams, we need to acquire the SharePoint site URL first.
- Add a new tab within a Channel in Teams
- Select “Website”:
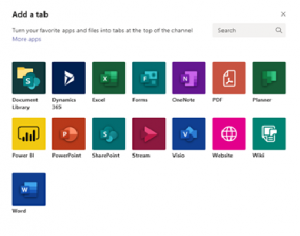
- Add a name and the URL you copied from the SharePoint site
- Sign in to Microsoft when prompted.
Questions about Data Retention
Information about Office 365 data residency, including Teams data, is located on the Office 365 Data Residency Guidelines handout.
If you deleted files from the Files or SharePoint tab you can retrieve it for a brief period of time.
- Open the channel or tab where the files were originally located
- Click Open in SharePoint.
- Once the SharePoint site opens, click Recycle bin from the left bar. Your deleted files should be visible there.
- To restore the file, select the file and click on Restore.
Microsoft retains deleted files in the recycle bin for a brief period only. They stay in the site Recycle Bin, unless someone deletes them from there or empties that Recycle Bin. Please refer to the Teams – Terms of Use for more details.
When a channel is deleted, Teams hides the messages that make up channel conversations and starts a 21-day countdown. During this period, a team owner (or a member, if allowed), can restore the channel. Once the period elapses, Teams permanently removes the conversations and they become irrecoverable. Please refer to the Teams – Terms of Use for more details.
When you Delete the team. Your team will be permanently removed.
Remember:
- Deleting a team removes the team mailbox and calendar from Exchange.
- The corresponding SharePoint site and all its files will also be deleted.
- And any OneNote notebook, Planner plan, workspace, or Stream group affiliated with the team will also be deleted.
IT admins may be able to retrieve the team during a brief window of time. Please refer to the Teams – Terms of Use for more details.
Questions about Chat
The Chat feature of a Team Channel remains visible to all current and future members of the Channel. As such, it is important to think of all messages in the Chat as a permanent records. * Note that private chat (1:1 or 1:Many) won’t be visible to all the members of the team.
If no one has replied to the message that you delete, then it will disappear typically within a few hours. If the message has been replied to then message will remain.
When you delete a message, messages go into the Recycle bin for 30 days (which both messages and teams can be restored from by the team owner or admin). After that, it is permanently deleted.
You can use teams through a web browser only, through Office 365. However, the best experience is typically found by downloading the app.
Questions about Calls
Teams supports the ability for users to make Voice over Internet Protocol (VoIP) calls from one Teams user to another. You can make one-on-one or group calls with anyone within MSVU directly from a chat without having to host a team meeting.
- Go to your chat list, click the “New Chat” button to start a new conversation:
![]()
Alternately, you can search for the name of the person you would like to talk to by typing their name in the “Search” box at the top of the Teams window:
![]()
2. Type the name or names into the “To:” field at the top of your new chat.
![]()
3. Select “Video Call” button or the “Audio Call” button to start a call:
Audio Call:
![]()
Video Call:
![]()
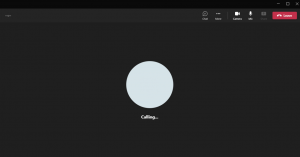
4. The Teams meeting window will automatically appear within the Microsoft Teams program window and will start “ringing” the other participants in the meeting call.
Audio Calls
· You need at least one sound recording device (a microphone) and at least one sound receiving device (headphones) to make audio calls.
Video Calls
· To make video calls; you need at least one sound and one video recording/receiving devices for video calls. This can include a camera/screen for video input/output and a microphone/headphone device for sound input/output). We strongly recommend using a headset with your device as it provides both input (built-in microphone) and output devices (speakers built into the headset) whilst not creating feedback/reverb issues.
· These input/output devices for Teams calls can either be built-into your device (laptops, tablets, and smartphones) or be externally plugged into the device (desktop PCs) if the device does not have any sound/video recording and receiving devices.
This functionality is currently not available in Teams at MSVU.