Print or scan at multiple locations on campus using a secure portal or at the multifunction printers located in the Library Learning Commons , computer labs and Rosaria Crows’ Nest

In order to print you must first prepay for “print credits” using PaperCut.
Note: print credits can also be purchased at the Library Circulation Desk.
Login to PaperCut using either your MSVU username or email address.
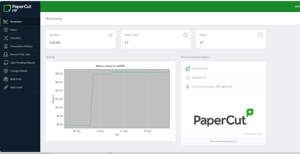
Right Side Menu Items:
Summary – shows your print balance and details of previous print jobs.
Rates – shows the typical print cost for grayscale and color prints.
Transfers – you have the option to transfer print credits from your account to a friend’s account. You will need to enter your friend’s username and choose an amount, click transfer. You should see your available credit reduced by the amount you transferred.
Transaction history – show when you have added credit, printed, or transferred credits to another user.
Recent print jobs – show your recent printing history including the name of the document printed and to what printer it was sent to.
Jobs pending release – this is typically used for secure printing.
Change details – allows you to set a pin code for secure printing (option coming soon).
Web print – an option to print via the web interface, typically utilized by personal devices. At this time, you can only print PDFs, images, text files and documents from the Microsoft Suite of applications such as Excel or Word.
Add credit – a self-serve option to add print credits to your account with a credit card such as Visa or Mastercard. The web payment is powered by Moneris, the papercut system does not store any card information. The web payment is powered by Moneris (PaperCut does not store any card details).
Logout is in the top right corner, click on your username and select logout.
*colour printers are located in Library Learning Commons , Seton 413 Education CRC, Rosaria Crows’ Nest.
IT&S advises you to do a print preview before sending a print job to be printed to ensure you are printing what you intended. You are responsible to pay for all pages printed from your account.
Credit refunds will be deposited on your account if it is clear the paper is damaged or the print is not satisfactory (faded or blurred).
IT&S does not provide cash refunds. At the end of an academic term, the IT&S Help Desk will provide refunds if you have cash remaining on your account.
When you login to a computer located in any MSVU computer lab, including those in the Library Learning Commons, you will notice the PaperCut popup which shows your current balance.
If you close the popup, it wil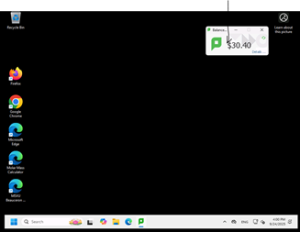 l run in the background and can be accessed by clicking on it from the task bar.
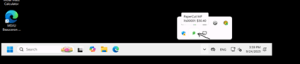
Printing steps will differ depending on the device and application you are printing from. The printer dialogue box, with the white checkmark in the green circle, is the default printer for the location that you are printing from.
Note: Most printers have just one print queue, the exception are the printers in the Library Learning Commons where there are two separate queues directed to different printers. The default printer in Library Learning Commons is LibraryPrint1 and is set to print double-sided and grayscale. Select LibraryPrint2 should the default printer be unavailable. You can also change the color and duplex settings by clicking on the Preferences or Printer Properties button.
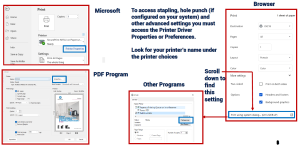
After clicking Preferences or Printer Properties
The default setting is grayscale, to print in color use the pull down and select auto color on the printer properties dialogue box.
To print single sided, click the Print Type and on the pulldown select 1-sided.
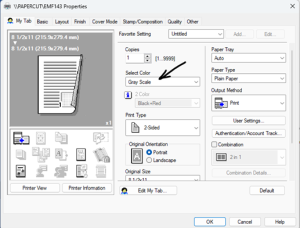
Subsequent prints will print in the method selected. Once you logout or restart the PC, the print settings will revert back to the default.
It is recommended to print in grayscale unless you require the printout to have color as the per page cost is more. If you want to print in color it is recommended to use Auto color; this setting automatically determines which pages need to be printed in color and then changes back to grayscale.
Note: If the printer does not support color printing, such as the default printer for SAC329 and SAC331 labs, no color option will be present.
Other Print Driver Setting Options:
Original Orientation – Of Originals (in file)
Original Size – Size of originals in file
Copies – Quantity
Print Type – 2 Sided, 1 Sided or Booklet
From web browser on your device login to PaperCut using either your MSVU username or email address.
You will need a positive balance to be able to print, refer to section ‘Prepay for Printing & Printing Charges’ for instruction on how to add credits.
Step 1: Click on Web Print found on the left menu.
Step 2: Click on Submit a Job.
Step 3: Choose your printer/Print Queue.
For example, if you are in the Library Learning Commons you would choose papercut\LibraryPrint1 (black arrow)
If you are in Seton, you would likely choose papercut\SAC331 (indigo arrow)
Printer queues currently set up to automatically print once you submit the job via webPrint for students are:
Library Learning Commons : Papercut\LibraryPrint1, Papercut\LibraryPrint2
Seton 331 Computer Lab: Papercut\SAC331
Rosaria 203 Crows’ Nest: Papercut\Ros203
Note: these four printers are configured for grayscale and duplex and you CAN NOT change the settings. If you need to print single sided or in color, choose the appropriate virtual print queue (green arrow). For example: Papercut\webprint-colour simplex8.5×11 secure (virtual) is the option to select if you wish to print with the following options: secure, single sided(simplex0, auto color.
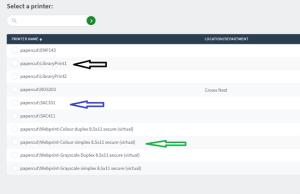
Secure print also allows you to submit the print job and release it to be printed later when you are ready. This is recommended for any confidential material or if you are not located close to the printer you are sending your print job too.
Step 4: Click on Print Options and Account Selection and select the number of copies.
Step 5: Click on Upload Documents. Drag and drop a file or choose Upload from Computer (browse for the file you wish to print), click OPEN to add it.
Step 6: Click Upload & Complete. The print job status will say submitting, then Rendering, then Queued for printing.
If you selected one of the four Papercut\Webprint secure (virtual) queues, after submitting the print job you will need to release the print job either through the Papercut web interface or by going to the printer and logging into it.
To release a print job by logging in at the printer using your MSVU email address and password, tap the print job release button on the printer screen and select the job to print.
To release a print job with the Papercut web interface, click on Recent Print Jobs on the left to reveal your print history. If you have print jobs to release it should look like this:
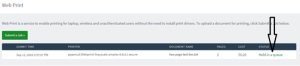
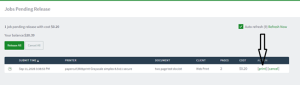
Click on the printer you want to release the print job to:
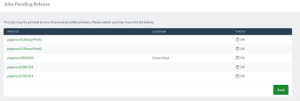
It should queue for printing, the job will disappear from the Jobs Pending Release page.
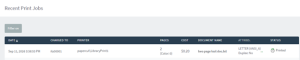
Go back to Recent Print Jobs and you should see your job has been printed or may be queued if there are other jobs ahead of it that are in queue to print.
You can scan to email for free from the printers in the Library Information Commons Printing Hub.
To scan to email: