Baked Luskinikn
Recipe makes: 10 servings (1/10th of recipe per serving)
Preparation time: 5 to 10 minutes
Cook time: 25 to 30 minutes
Equipment: (1) one oven, (2) one 30 cm (12-inch) round or 23*23 cm (9*9-inch) square casserole dish or baking pan, (3) one set of measuring cups, (4) one set of measuring spoons, (5) one large mixing bowl, (6) one large spoon, (7) one knife, (8) one pair of oven mitts, (9) one cooling rack, (10) one spatula
What you need to make this recipe:
- 3 cups + 3 tablespoons all-purpose whole wheat flour
- 2 tablespoons baking powder
- 2 teaspoons salt
- ½ cup non-fat plain Greek yogurt
- 1 to 1 ½ cups water
- Cooking spray
How to make Baked Luskinikn:
- Preheat the oven to 205 °C (400°F).
- Lightly grease a 30 cm (12-inch) round casserole dish with cooking spray.
- Put 3 cups of the flour, the baking powder, and the salt in a large mixing bowl. Using a large spoon, stir until combined.
- Add the yogurt to the flour mixture. Stir until combined.
- Add ½ cup of water to the flour mixture. Stir until combined.
- Add another ½ cup of water to the flour mixture. Stir until a sticky dough is formed. If the dough is dry, add 1 tablespoon of water to the dough and stir to combine. Continue to add water to the dough, 1 tablespoon at a time, until the dough is sticky.
- Use 3 tablespoons of flour to flour a clean, dry flat surface (like a counter).
- Transfer the dough from the mixing bowl to the floured surface. Shape the dough into a disk about the size of the casserole dish.
- Put the dough in the prepared casserole dish. Gently press the dough into the dish.
- Score the top of the dough. The scores should divide the disk into 10 pieces that are the same size. (To learn how to score dough, see the “About this recipe” section below.)
- Bake for 25 to 30 minutes or until a toothpick inserted into the center of the Luskinikn comes out clean.
- Let the Luskinikn cool for 15 minutes in the casserole dish.
- Using a spatula, take the Luskinikn out of the dish. Put it on a cooling rack and let it cool for another 10 minutes.
- Using a knife, cut the Luskinikn into 10 pieces. You can also rip it into 10 pieces using clean hands.
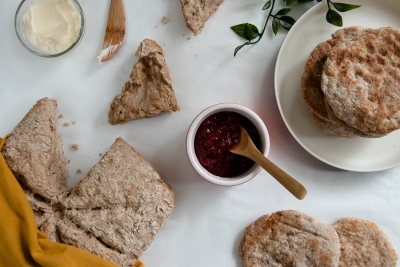
- Serve the Luskinikn on its own or with jam or butter.
Allergy information:
Contains wheat, gluten, and milk.
About this recipe:
Scoring
Scoring means to make shallow cuts (cuts that are not deep) in a food. Scoring bread dough before baking helps the dough rise.
To score dough, use a sharp knife to make cuts about ½ cm (¼ inch) to 1 cm (½ inch) deep in the top of the dough. The number, length, and pattern of cuts used to score dough depends on the shape of the dough and the type of bread. For round bread like Baked Luskinikn, and “X” shape or cuts that divide the dough into equal pieces is often used.
Luskinikn
Most Indigenous groups on Turtle Island (North America) make some version of a simple bread made with a few ingredients. In Mi’kmaw, we call it “Luskinikn”. It is also commonly called “luski”, “bannock”, “4-cents”, or “fry bread” when fried. This bread represents a food that was very low cost and affordable for Mi’kmaq, making it a staple when other foods could not be accessed. In fact, this is where the name “4-cents” comes from, as it once only cost 4 cents to make. The bread can be cooked over a fire, in an oven, or fried in oil. It can be eaten on its own, or with different toppings like jam or butter.
While Mi’kmaq did not make the same version of Luskinikin pre-contact, they did make something similar using roots. The root or “bulb” of some native plant species would have been used to create a dough that was flattened and dried.
Storage information:
Baked Luskinikn is best eaten fresh. Leftovers can be stored in an airtight container at room temperature for 2 to 3 days, in the fridge for up to 5 days, or 2 to 3 months in the freezer.
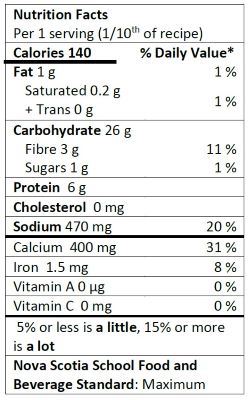
Nutrition Information:
Print recipe card with no photo
Two Eyed Seeing Project Collaboration